> ## Documentation Index
> Fetch the complete documentation index at: https://messenger-docs.cogfy.com/llms.txt
> Use this file to discover all available pages before exploring further.
# Create Your First Workflow
> In this tutorial you will quickly learn how to create a new workflow and publish it in a phone number.
In this tutorial, we will create a simple AI assistant powered workflow.
## Requirements
You need a **phone number** to publish a workflow and make it available to your users. Please refer to the phone number documentation for more information.
You can still create workflows and test them in our sandbox preview.
## Creating your first workflow
Inside Cogfy Messenger, go to the Workflows section in the sidebar or visit [messenger.cogfy.com/:WORKSPACE/workflows](https://messenger.cogfy.com) and click *New workflow*.
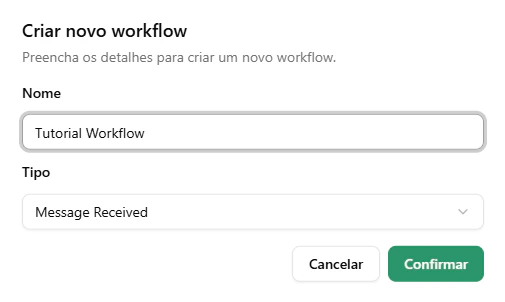
Fill in the **name**, choose the **workflow type** and hit *Confirm*.
> For this tutorial, we will use the **Message Received** workflow.
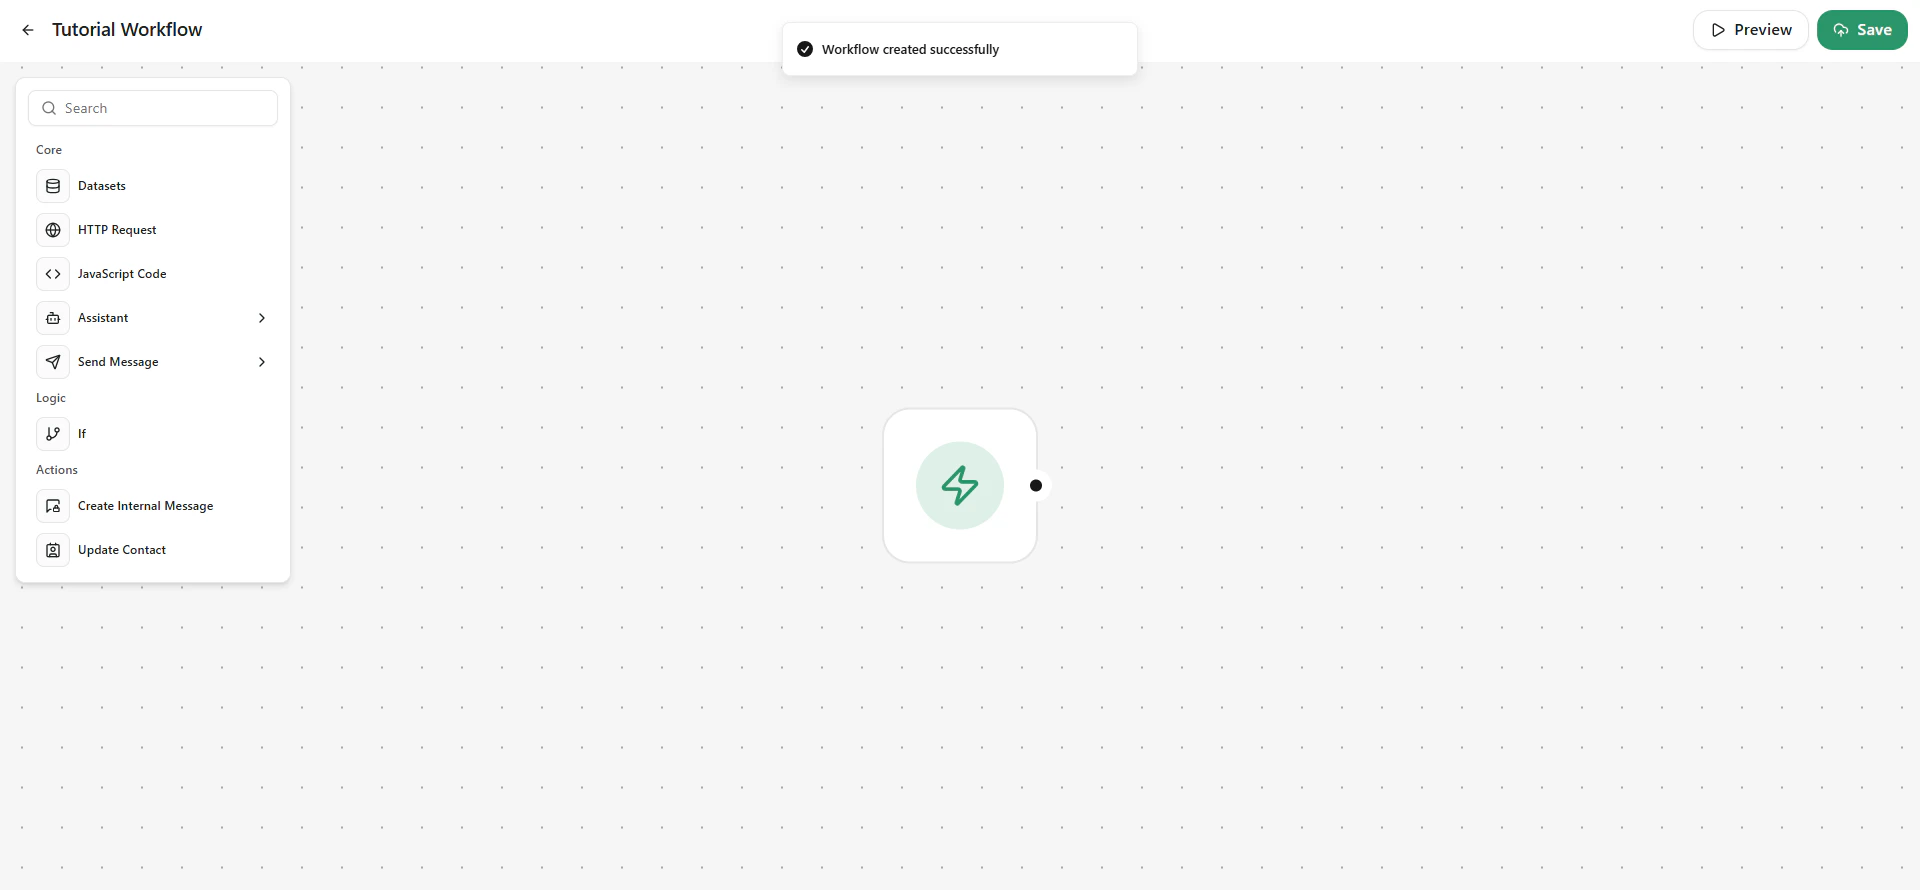
 At this point you should be in the workflow sandbox and the workflow has already been created.
You should see something like this:
At this point you should be in the workflow sandbox and the workflow has already been created.
You should see something like this:
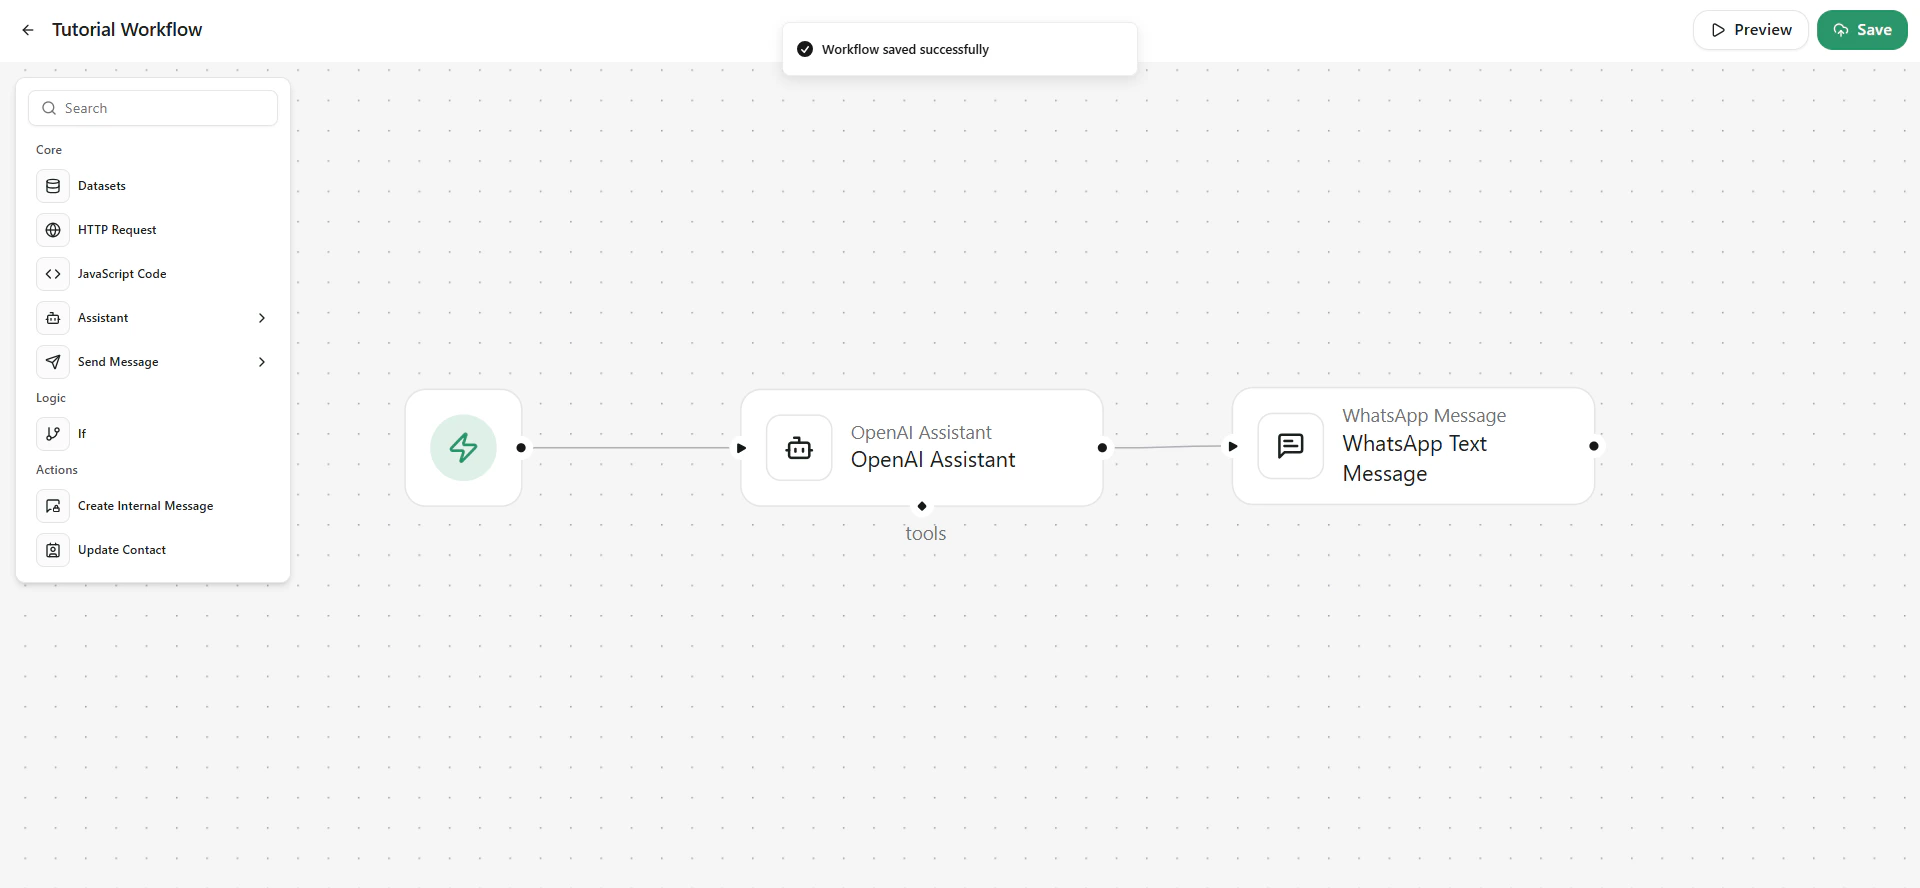
 On the sidebar, click on Assistant and add a OpenAI Assistant Node.
Connect the trigger node to the OpenAI Assistant Node by clicking and dragging the handles, therefore creating an edge.
***
On the sidebar, click on Send Message and add a WhatsApp Text Message Node.
Connect the OpenAI Assistant Node to the WhatsApp Text Message Node.
***
Now we have created a complete workflow path that has a trigger, an AI Assistant and an output through WhatsApp.
Don't forget to save by clicking the save button at the top right corner!
On the sidebar, click on Assistant and add a OpenAI Assistant Node.
Connect the trigger node to the OpenAI Assistant Node by clicking and dragging the handles, therefore creating an edge.
***
On the sidebar, click on Send Message and add a WhatsApp Text Message Node.
Connect the OpenAI Assistant Node to the WhatsApp Text Message Node.
***
Now we have created a complete workflow path that has a trigger, an AI Assistant and an output through WhatsApp.
Don't forget to save by clicking the save button at the top right corner!
 Select the OpenAI Assistant Node (a green border shows which node is selected) and click the Edit button, or double click the node to open the Edit Node Dialog.
> You can click the *Brackets* **\{}** button on each field to enter interpolation mode. With interpolation, we can access properties of previous nodes by using `{{$nodes['Node Name'].property}}`.
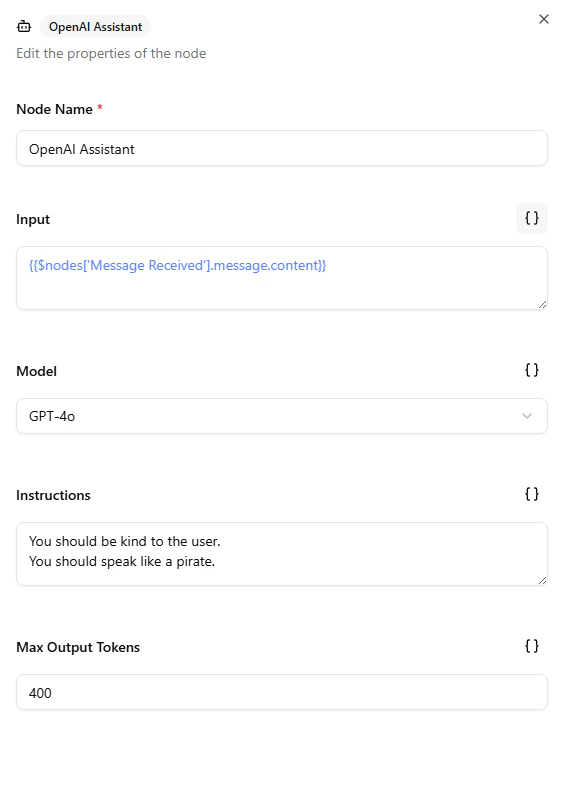
* **Input** is the message to be sent to the Assistant. For our OpenAI Assistant Node, we want the Message Received trigger content (e.g. the user message) to be the input.
On the *Input* field activate interpolation mode and insert `{{$nodes['Message Received'].message.content}}`.
* **Model** is the AI brain that your users will be talking to, there are more powerful and expensive models as well as simpler, cheap and blazing fast models. You can choose any model you like, in this tutorial we will be using `GPT-4o`.
* **Instructions** are a way to control the Assistant to behave just how you'd like, you can make it kind, serious, make it give shorter answers or even make it talk like a pirate! You can give any instructions you want, in this tutorial we will just ask the AI Assistant to be kind... and to talk like a pirate... Ahoy!
* **Max output tokens** will depend on the model you chose, if you choose a powerfull model, you should bump this setting up. Otherwise, you can take it a bit slower. In this tutorial, we will use a maximum of `400` tokens.
> Tokens are the base element for AI processes. It's how the AI segments your text before generating a response.
After all this, your OpenAI Assistant Node should look something like this:
Select the OpenAI Assistant Node (a green border shows which node is selected) and click the Edit button, or double click the node to open the Edit Node Dialog.
> You can click the *Brackets* **\{}** button on each field to enter interpolation mode. With interpolation, we can access properties of previous nodes by using `{{$nodes['Node Name'].property}}`.
* **Input** is the message to be sent to the Assistant. For our OpenAI Assistant Node, we want the Message Received trigger content (e.g. the user message) to be the input.
On the *Input* field activate interpolation mode and insert `{{$nodes['Message Received'].message.content}}`.
* **Model** is the AI brain that your users will be talking to, there are more powerful and expensive models as well as simpler, cheap and blazing fast models. You can choose any model you like, in this tutorial we will be using `GPT-4o`.
* **Instructions** are a way to control the Assistant to behave just how you'd like, you can make it kind, serious, make it give shorter answers or even make it talk like a pirate! You can give any instructions you want, in this tutorial we will just ask the AI Assistant to be kind... and to talk like a pirate... Ahoy!
* **Max output tokens** will depend on the model you chose, if you choose a powerfull model, you should bump this setting up. Otherwise, you can take it a bit slower. In this tutorial, we will use a maximum of `400` tokens.
> Tokens are the base element for AI processes. It's how the AI segments your text before generating a response.
After all this, your OpenAI Assistant Node should look something like this:
 Hit the save button and move on to the next step!
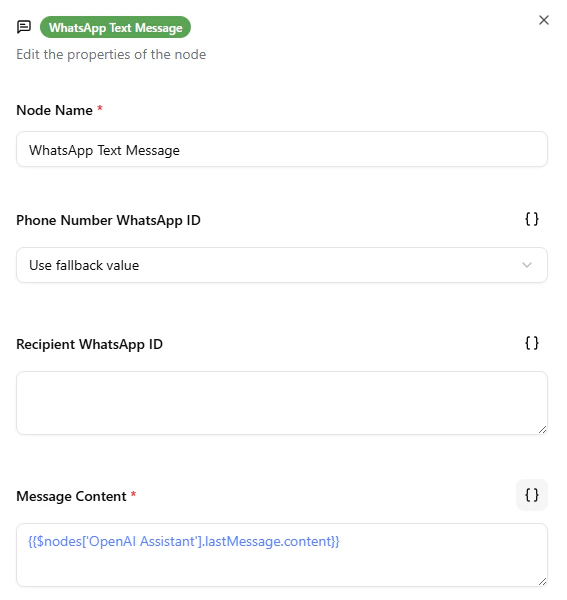
Select the Send WhatsApp Text Message Node and click the edit button.
* **Phone Number WhatsApp ID** is the WhatsApp ID of the phone number that will send that message. This field will list all your WhatsApp phone numbers connected to Cogfy.
You can choose *Use fallback value* to use the phone number that received the message in the trigger node, which is our case in this tutorial.
You can achieve the same result as *Use fallback value* by using the following in interpolation mode.
```
{{$nodes['Message Received'].message.to}}
```
* **Recipient WhatsApp ID** is the WhatsApp ID of the phone number that will receive the message sent from this node. You can leave it blank to use the phone number that sent the message caught by the trigger node, that is the user that sent the message, which is our case in this tutorial.
You can achieve the same result as blank value by using the following in interpolation mode.
```
{{$nodes['Message Received'].message.from}}
```
* **Message Content** is the content to be sent in the WhatsApp message. In this tutorial, we want this to be the message generated by our OpenAI Assistant Node.
Use interpolation mode to access the Assistant last message's content.
```
{{$nodes['OpenAI Assistant'].lastMessage.content}}
```
After all this, your OpenAI Assistant Node should look something like this:
Hit the save button and move on to the next step!
Select the Send WhatsApp Text Message Node and click the edit button.
* **Phone Number WhatsApp ID** is the WhatsApp ID of the phone number that will send that message. This field will list all your WhatsApp phone numbers connected to Cogfy.
You can choose *Use fallback value* to use the phone number that received the message in the trigger node, which is our case in this tutorial.
You can achieve the same result as *Use fallback value* by using the following in interpolation mode.
```
{{$nodes['Message Received'].message.to}}
```
* **Recipient WhatsApp ID** is the WhatsApp ID of the phone number that will receive the message sent from this node. You can leave it blank to use the phone number that sent the message caught by the trigger node, that is the user that sent the message, which is our case in this tutorial.
You can achieve the same result as blank value by using the following in interpolation mode.
```
{{$nodes['Message Received'].message.from}}
```
* **Message Content** is the content to be sent in the WhatsApp message. In this tutorial, we want this to be the message generated by our OpenAI Assistant Node.
Use interpolation mode to access the Assistant last message's content.
```
{{$nodes['OpenAI Assistant'].lastMessage.content}}
```
After all this, your OpenAI Assistant Node should look something like this:
 Hit the save button and move on to the next step!
Now you have a complete workflow!
You can test it using the *Preview* button on the top right corner.
Hit the save button and move on to the next step!
Now you have a complete workflow!
You can test it using the *Preview* button on the top right corner.
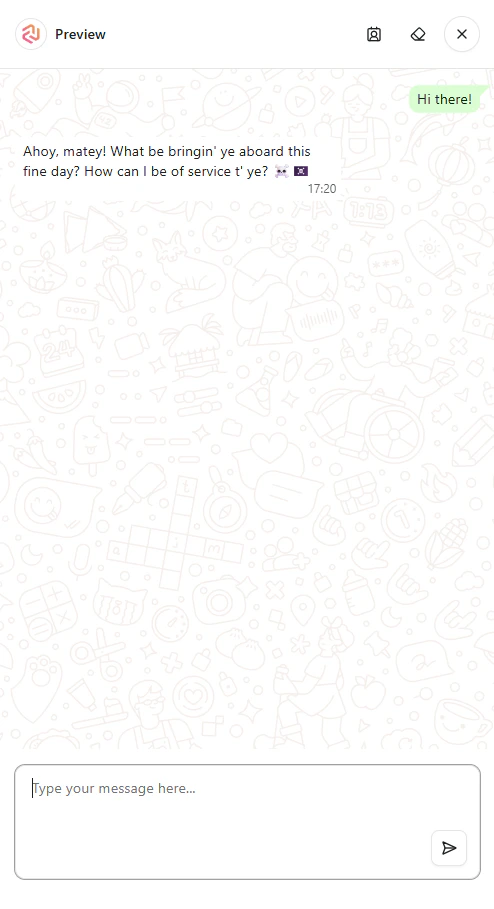 Nice, it worked!
Hit the back button and go to the Chats section in the sidebar.
Choose the desired phone number from the dropdown menu. Click the button and select *Publish Workflow*
Select your workflow and hit *Save*.
Nice, it worked!
Hit the back button and go to the Chats section in the sidebar.
Choose the desired phone number from the dropdown menu. Click the button and select *Publish Workflow*
Select your workflow and hit *Save*.
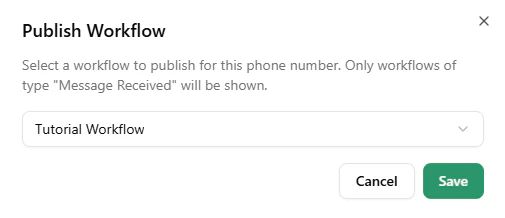 Congratulations! You have published a workflow for your users! You can now send a message to that phone number and see your workflow in production.
