> ## Documentation Index
> Fetch the complete documentation index at: https://messenger-docs.cogfy.com/llms.txt
> Use this file to discover all available pages before exploring further.
# Workflow
> The core definition of an Engine's behavior
In this chapter, you will learn about the core of an Engine: the workflow, and how to set it up.
# What is a workflow?
The Engine's workflow is a series of steps that define how each incoming message is processed, which decisions are made,
which actions are taken, and what replies are generated.
Think of it as a recipe or, for those familiar with programming, an algorithm, shown below:
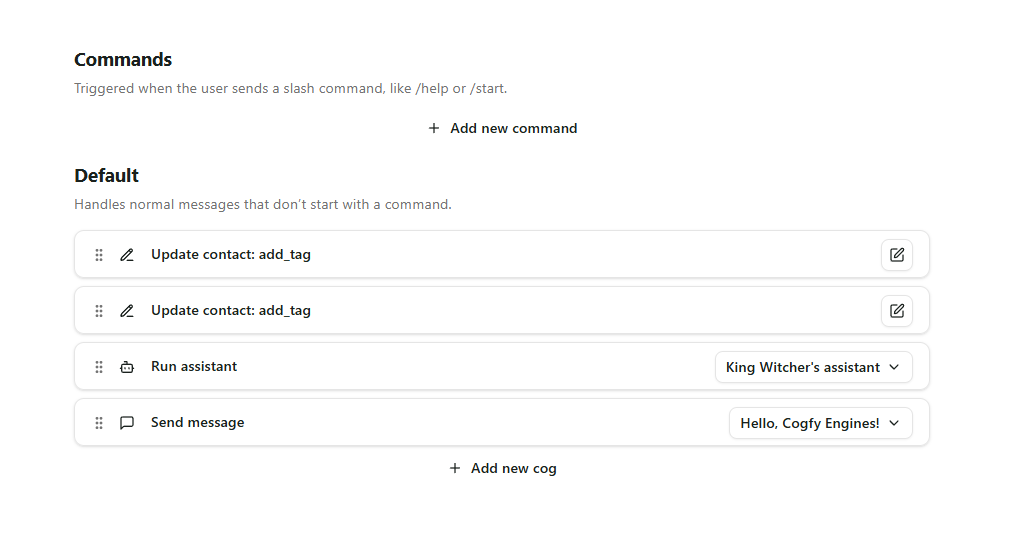 As you may have noticed, there are two sections in the workflow: **Commands** and **Default**, with four instructions in
the Default section, which are called **cogs**.
## The Default section
The **Default** section is where, by default, all incoming messages are handled.
In the example above, every time a
message is received, the engine will set two custom tags on the current contact, then it will run the "King Witcher's
assistant" assistant with some custom prompts, which will generate a reply that will be sent back to the user and,
finally, it will send a message named *Hello, Cogfy Engines!*.
## The Commands section
The **Commmands** section, if you haven't guessed already, is commands can be defined to handle speciific messages that
begin with "/" to run a different list of cogs different from the default one:
As you may have noticed, there are two sections in the workflow: **Commands** and **Default**, with four instructions in
the Default section, which are called **cogs**.
## The Default section
The **Default** section is where, by default, all incoming messages are handled.
In the example above, every time a
message is received, the engine will set two custom tags on the current contact, then it will run the "King Witcher's
assistant" assistant with some custom prompts, which will generate a reply that will be sent back to the user and,
finally, it will send a message named *Hello, Cogfy Engines!*.
## The Commands section
The **Commmands** section, if you haven't guessed already, is commands can be defined to handle speciific messages that
begin with "/" to run a different list of cogs different from the default one:
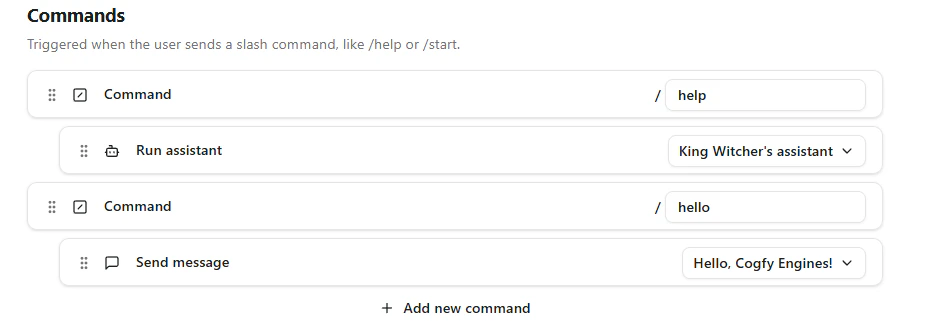 In the example above, you can see that there are two special cogs, called **Command Cogs**. Each command cog has a text
field where you can define the name of the command it will handle.
In this case, the first command cog will handle the `/help` command, while the second one will handle the `/hello`
command. Inside each command cog's scope, there is a different list of cogs to be executed.
You can easily add new cogs to a command by right clicking it or by simply dragging and dropping a cog from anywhere in
the command cog.
In the example above, you can see that there are two special cogs, called **Command Cogs**. Each command cog has a text
field where you can define the name of the command it will handle.
In this case, the first command cog will handle the `/help` command, while the second one will handle the `/hello`
command. Inside each command cog's scope, there is a different list of cogs to be executed.
You can easily add new cogs to a command by right clicking it or by simply dragging and dropping a cog from anywhere in
the command cog.